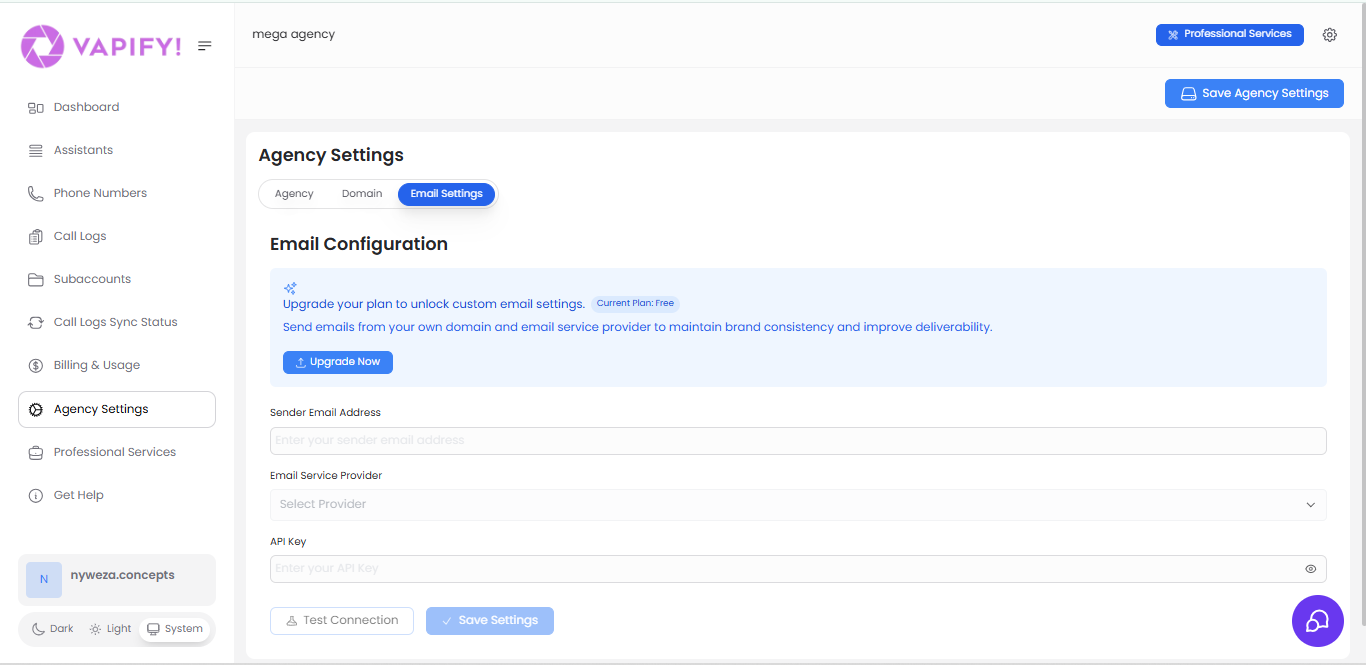
By default, platform emails (invitations, password resets, notifications) send from Vapify’s address. Custom email settings let them send from your own domain instead.
Enter your sender email address (e.g., support@youragency.com).
Select your provider and enter its credentials:
Mailgun: Private API Key (starts with “key-”) from Mailgun’s Settings → API Security.
Postmark: Server API Token from your Postmark server’s API Tokens tab.
Sendgrid: API key with Mail Send permissions.
SMTP: server/hostname, port (587 for TLS, 465 for SSL), username, and password (use an app-specific password for Google Workspace or Microsoft 365).
Click Test Connection.
Once the test succeeds, click Save Settings.
Mailgun and Postmark both offer free tiers and are the recommended starting points; check their pricing pages for current limits. Use SMTP only if you need a specific existing mail server.
Never use your primary email password for SMTP. Use an app-specific password, and rotate API keys periodically.
{"docsConfig":{"theme":"mint","$schema":"https://mintlify.com/docs.json","name":"Vapify Documentation","colors":{"primary":"#CC6CE5","light":"#EAB8E4","dark":"#A45B9E"},"logo":{"light":"https://mintcdn.com/vapifybykanzucode/w9nx1mezgBOVwlhx/logo/vapify-logo.png?fit=max\u0026auto=format\u0026n=w9nx1mezgBOVwlhx\u0026q=85\u0026s=a41c5eb26b97ea79ec359f653c0c3bcf","dark":"https://mintcdn.com/vapifybykanzucode/w9nx1mezgBOVwlhx/logo/vapify-logo.png?fit=max\u0026auto=format\u0026n=w9nx1mezgBOVwlhx\u0026q=85\u0026s=a41c5eb26b97ea79ec359f653c0c3bcf"},"favicon":"https://mintcdn.com/vapifybykanzucode/w9nx1mezgBOVwlhx/favicon.png?fit=max\u0026auto=format\u0026n=w9nx1mezgBOVwlhx\u0026q=85\u0026s=7871d47d85fdc4e75d17d93faf7d3213","navbar":{"links":[{"href":"mailto:support@info.vapify.agency","label":"Support"}],"primary":{"type":"button","label":"Login","href":"https://app.vapify.agency"}},"styling":{"latex":true},"navigation":{"global":{"anchors":[{"anchor":"Main Site","icon":"globe","href":"https://vapify.agency"}]},"pages":[]}},"deployment":{"deploymentMetadataValue":{"subdomain":"vapifybykanzucode","hasAudioNarration":false,"actualSubdomain":"vapifybykanzucode","customDomains":["docs.vapify.agency"],"gitSource":{"type":"gitlab","owner":"kanzucodeinc/yogela.ai","repo":"support-documentation","projectId":71966599,"deployBranch":"main","contentDirectory":"","isPrivate":true,"mountPath":"","label":""},"chroma":{"liveDeploymentHistoryId":"6a744884d30fc86fd2bfcc57","collectionId":"0721e4b1-6e70-497c-b482-763287f7d41b","schemaVersion":"v3","latestBuiltDeploymentHistoryId":"6a744884d30fc86fd2bfcc57"},"entitlements":{},"buildId":"6a744884d30fc86fd2bfcc57:success","clientVersion":"0.0.3939","searchFilterCounts":[{"language":"default","tag":"Documentation","count":60},{"language":"default","tag":"Operate","count":21},{"language":"default","tag":"Get Started","count":14},{"language":"default","tag":"Reference","count":13},{"language":"default","tag":"Customize \u0026 Integrate","count":12},{"language":"default","tag":"Running Your Agency","count":11},{"language":"default","tag":"Getting Started","count":8},{"language":"default","tag":"Guides","count":8},{"language":"default","tag":"Integrations","count":7},{"language":"default","tag":"Billing","count":6}]},"assistantConfig":{},"hasChatPermissions":false,"hasWebMcpPermissions":false,"toggles":[{"name":"kill-isr","enabled":true,"variant":{"name":"disabled","enabled":false,"feature_enabled":true},"impressionData":false},{"name":"agent-mintlify-slack","enabled":true,"variant":{"name":"disabled","enabled":false,"feature_enabled":true},"impressionData":false},{"name":"editor-v7-file-tree","enabled":true,"variant":{"name":"disabled","enabled":false,"feature_enabled":true},"impressionData":false},{"name":"agent-integrations-settings","enabled":true,"variant":{"name":"disabled","enabled":false,"feature_enabled":true},"impressionData":false},{"name":"automations-pr-grouping","enabled":true,"variant":{"name":"disabled","enabled":false,"feature_enabled":true},"impressionData":false},{"name":"custom-prefix","enabled":true,"variant":{"name":"disabled","enabled":false,"feature_enabled":true},"impressionData":false},{"name":"analytics-v7","enabled":true,"variant":{"name":"disabled","enabled":false,"feature_enabled":true},"impressionData":false},{"name":"user-flows-analytics","enabled":true,"variant":{"name":"disabled","enabled":false,"feature_enabled":true},"impressionData":false},{"name":"no-publish-flow","enabled":true,"variant":{"name":"disabled","enabled":false,"feature_enabled":true},"impressionData":false},{"name":"workos-onboarding","enabled":true,"variant":{"name":"disabled","enabled":false,"feature_enabled":true},"impressionData":false},{"name":"llms-txt-v2","enabled":true,"variant":{"name":"disabled","enabled":false,"feature_enabled":true},"impressionData":false},{"name":"pause-universal-search-reconcile","enabled":true,"variant":{"name":"disabled","enabled":false,"feature_enabled":true},"impressionData":false},{"name":"snapshot-serving-live","enabled":true,"variant":{"name":"disabled","enabled":false,"feature_enabled":true},"impressionData":false},{"name":"stripTemperatureMiddleware","enabled":true,"variant":{"name":"disabled","enabled":false,"feature_enabled":true},"impressionData":false},{"name":"per-site-search-delta","enabled":true,"variant":{"name":"disabled","enabled":false,"feature_enabled":true},"impressionData":false},{"name":"support-platform-pylon-zendesk","enabled":true,"variant":{"name":"disabled","enabled":false,"feature_enabled":true},"impressionData":false},{"name":"snapshot-serving","enabled":true,"variant":{"name":"disabled","enabled":false,"feature_enabled":true},"impressionData":false},{"name":"instant-rollback","enabled":true,"variant":{"name":"disabled","enabled":false,"feature_enabled":true},"impressionData":false},{"name":"granular-notifications-server","enabled":true,"variant":{"name":"disabled","enabled":false,"feature_enabled":true},"impressionData":false},{"name":"granular-notifications","enabled":true,"variant":{"name":"disabled","enabled":false,"feature_enabled":true},"impressionData":false},{"name":"editor-private-page-search","enabled":true,"variant":{"name":"disabled","enabled":false,"feature_enabled":true},"impressionData":false},{"name":"automations-fable","enabled":true,"variant":{"name":"disabled","enabled":false,"feature_enabled":true},"impressionData":false},{"name":"fixed-ai-action-pricing","enabled":true,"variant":{"name":"disabled","enabled":false,"feature_enabled":true},"impressionData":false},{"name":"automation-resolve-merge-conflict","enabled":true,"variant":{"name":"disabled","enabled":false,"feature_enabled":true},"impressionData":false},{"name":"scoped-publishing","enabled":true,"variant":{"name":"disabled","enabled":false,"feature_enabled":true},"impressionData":false},{"name":"mintql","enabled":true,"variant":{"name":"disabled","enabled":false,"feature_enabled":true},"impressionData":false},{"name":"page-level-analytics","enabled":true,"variant":{"name":"disabled","enabled":false,"feature_enabled":true},"impressionData":false},{"name":"editor-version-history-v2","enabled":true,"variant":{"name":"disabled","enabled":false,"feature_enabled":true},"impressionData":false},{"name":"editor-nav-generations","enabled":true,"variant":{"name":"disabled","enabled":false,"feature_enabled":true},"impressionData":false},{"name":"billing-page-v2","enabled":true,"variant":{"name":"disabled","enabled":false,"feature_enabled":true},"impressionData":false},{"name":"workspace-projects","enabled":true,"variant":{"name":"disabled","enabled":false,"feature_enabled":true},"impressionData":false},{"name":"assistant-v5","enabled":true,"variant":{"name":"disabled","enabled":false,"feature_enabled":true},"impressionData":false},{"name":"byok-sep-25","enabled":true,"variant":{"name":"disabled","enabled":false,"feature_enabled":true},"impressionData":false},{"name":"fork-pr-previews","enabled":true,"variant":{"name":"disabled","enabled":false,"feature_enabled":true},"impressionData":false},{"name":"revalidation-jwt","enabled":true,"variant":{"name":"disabled","enabled":false,"feature_enabled":true},"impressionData":false},{"name":"vite-origin","enabled":true,"variant":{"name":"disabled","enabled":false,"feature_enabled":true},"impressionData":false},{"name":"editor-agent-model-picker","enabled":true,"variant":{"name":"disabled","enabled":false,"feature_enabled":true},"impressionData":false},{"name":"billing-updated-9-15","enabled":true,"variant":{"name":"disabled","enabled":false,"feature_enabled":true},"impressionData":false},{"name":"hobby-abuse-scan","enabled":true,"variant":{"name":"disabled","enabled":false,"feature_enabled":true},"impressionData":false},{"name":"dashboard-inbox","enabled":true,"variant":{"name":"disabled","enabled":false,"feature_enabled":true},"impressionData":false}],"isAtlas":false,"googleFontsInlined":false},"customCss":[{"filePath":"custom.css","content":"#sidebar a,#sidebar button,nav[aria-label=Sidebar] a,nav[aria-label=Sidebar] button{transition:background-color .18s ease,color .18s ease}#sidebar svg,nav[aria-label=Sidebar] svg{transition:transform .2s ease}#sidebar,nav[aria-label=Sidebar]{scroll-behavior:smooth}@media (prefers-reduced-motion:reduce){#sidebar a,#sidebar button,#sidebar svg,nav[aria-label=Sidebar] a,nav[aria-label=Sidebar] button,nav[aria-label=Sidebar] svg{transition:none}}"}],"page":{"pagePath":"white-label/custom-email","slug":"/white-label/custom-email","pageMetadata":{"title":"Custom Email","description":"Send platform emails from your own domain using Mailgun, Postmark, Sendgrid, or SMTP.","icon":"at","href":"/white-label/custom-email"},"description":{"compiledSource":"\"use strict\";\nconst {jsx: _jsx} = arguments[0];\nconst {useMDXComponents: _provideComponents} = arguments[0];\nfunction _createMdxContent(props) {\n const _components = {\n p: \"p\",\n ..._provideComponents(),\n ...props.components\n };\n return _jsx(_components.p, {\n children: \"Send platform emails from your own domain using Mailgun, Postmark, Sendgrid, or SMTP.\"\n });\n}\nfunction MDXContent(props = {}) {\n const {wrapper: MDXLayout} = {\n ..._provideComponents(),\n ...props.components\n };\n return MDXLayout ? _jsx(MDXLayout, {\n ...props,\n children: _jsx(_createMdxContent, {\n ...props\n })\n }) : _createMdxContent(props);\n}\nreturn {\n default: MDXContent\n};\n","frontmatter":{},"scope":{}},"pageType":"default","mdx":{"mdxSource":{"compiledSource":"\"use strict\";const{Fragment:_Fragment,jsx:_jsx,jsxs:_jsxs}=arguments[0];const{useMDXComponents:_provideComponents}=arguments[0];function _createMdxContent(props){const _components={a:`a`,code:`code`,li:`li`,ol:`ol`,p:`p`,strong:`strong`,ul:`ul`,..._provideComponents(),...props.components},{Heading,OptimizedImage,Tip,Warning}=_components;if(!Heading)_missingMdxReference(`Heading`,true);if(!OptimizedImage)_missingMdxReference(`OptimizedImage`,true);if(!Tip)_missingMdxReference(`Tip`,true);if(!Warning)_missingMdxReference(`Warning`,true);return _jsxs(_Fragment,{children:[_jsxs(_components.p,{children:[_jsx(_components.strong,{children:`Estimated time:`}),` 5-10 minutes`]}),`\n`,_jsx(Heading,{level:`2`,id:`overview`,children:`Overview`}),`\n`,_jsx(_components.p,{children:`By default, platform emails (invitations, password resets, notifications) send from Vapify’s address. Custom email settings let them send from your own domain instead.`}),`\n`,_jsx(OptimizedImage,{src:`https://mintcdn.com/vapifybykanzucode/A3O19gLqD2_WDy2-/images/agencysettings3.png?fit=max\u0026auto=format\u0026n=A3O19gLqD2_WDy2-\u0026q=85\u0026s=f1d0097cc955272de196f3046acb7251`,alt:`Email Settings tab showing custom email provider configuration`,\"data-og-width\":`1366`,width:`1366`,\"data-og-height\":`665`,height:`665`,\"data-path\":`images/agencysettings3.png`,\"data-optimize\":`true`,\"data-opv\":`3`,srcset:`https://mintcdn.com/vapifybykanzucode/A3O19gLqD2_WDy2-/images/agencysettings3.png?w=280\u0026fit=max\u0026auto=format\u0026n=A3O19gLqD2_WDy2-\u0026q=85\u0026s=1849720892434ba66640144377d52117 280w, https://mintcdn.com/vapifybykanzucode/A3O19gLqD2_WDy2-/images/agencysettings3.png?w=560\u0026fit=max\u0026auto=format\u0026n=A3O19gLqD2_WDy2-\u0026q=85\u0026s=95c5d711627dd863a9f6e9f90c8d19ec 560w, https://mintcdn.com/vapifybykanzucode/A3O19gLqD2_WDy2-/images/agencysettings3.png?w=840\u0026fit=max\u0026auto=format\u0026n=A3O19gLqD2_WDy2-\u0026q=85\u0026s=e8c19bae084a09faa750ebf9f01a330e 840w, https://mintcdn.com/vapifybykanzucode/A3O19gLqD2_WDy2-/images/agencysettings3.png?w=1100\u0026fit=max\u0026auto=format\u0026n=A3O19gLqD2_WDy2-\u0026q=85\u0026s=4fc346c67dc31287a4ed9d6e4799a015 1100w, https://mintcdn.com/vapifybykanzucode/A3O19gLqD2_WDy2-/images/agencysettings3.png?w=1650\u0026fit=max\u0026auto=format\u0026n=A3O19gLqD2_WDy2-\u0026q=85\u0026s=447eca10264041b3e9a9756c61308fe0 1650w, https://mintcdn.com/vapifybykanzucode/A3O19gLqD2_WDy2-/images/agencysettings3.png?w=2500\u0026fit=max\u0026auto=format\u0026n=A3O19gLqD2_WDy2-\u0026q=85\u0026s=54f0c5a53e64159d578fd4313c54c6a8 2500w`}),`\n`,_jsx(Heading,{level:`2`,id:`prerequisites`,children:`Prerequisites`}),`\n`,_jsxs(_components.ul,{children:[`\n`,_jsx(_components.li,{children:`A paid plan (Starter, Business, Scale, or Partner). Not available on Free`}),`\n`,_jsx(_components.li,{children:`An account with Mailgun, Postmark, Sendgrid, or an existing SMTP server`}),`\n`]}),`\n`,_jsx(Heading,{level:`2`,id:`steps`,children:`Steps`}),`\n`,_jsxs(_components.ol,{children:[`\n`,_jsxs(_components.li,{children:[`Go to `,_jsx(_components.strong,{children:`Agency Settings → Email Settings tab`}),`.`]}),`\n`,_jsxs(_components.li,{children:[`Enter your sender email address (e.g., `,_jsx(_components.code,{children:`support@youragency.com`}),`).`]}),`\n`,_jsxs(_components.li,{children:[`Select your provider and enter its credentials:`,`\n`,_jsxs(_components.ul,{children:[`\n`,_jsxs(_components.li,{children:[_jsx(_components.strong,{children:`Mailgun`}),`: Private API Key (starts with “key-”) from Mailgun’s Settings → API Security.`]}),`\n`,_jsxs(_components.li,{children:[_jsx(_components.strong,{children:`Postmark`}),`: Server API Token from your Postmark server’s API Tokens tab.`]}),`\n`,_jsxs(_components.li,{children:[_jsx(_components.strong,{children:`Sendgrid`}),`: API key with Mail Send permissions.`]}),`\n`,_jsxs(_components.li,{children:[_jsx(_components.strong,{children:`SMTP`}),`: server/hostname, port (587 for TLS, 465 for SSL), username, and password (use an app-specific password for Google Workspace or Microsoft 365).`]}),`\n`]}),`\n`]}),`\n`,_jsxs(_components.li,{children:[`Click `,_jsx(_components.strong,{children:`Test Connection`}),`.`]}),`\n`,_jsxs(_components.li,{children:[`Once the test succeeds, click `,_jsx(_components.strong,{children:`Save Settings`}),`.`]}),`\n`]}),`\n`,_jsx(Tip,{children:_jsx(_components.p,{children:`Mailgun and Postmark both offer free tiers and are the recommended starting points; check their pricing pages for current limits. Use SMTP only if you need a specific existing mail server.`})}),`\n`,_jsx(Warning,{children:_jsx(_components.p,{children:`Never use your primary email password for SMTP. Use an app-specific password, and rotate API keys periodically.`})}),`\n`,_jsx(Heading,{level:`2`,id:`troubleshooting`,children:`Troubleshooting`}),`\n`,_jsxs(_components.ul,{children:[`\n`,_jsxs(_components.li,{children:[_jsx(_components.strong,{children:`Test connection fails`}),`: Recheck the API key for typos, confirm it has send permissions, and confirm your sender address is verified with the provider.`]}),`\n`,_jsxs(_components.li,{children:[_jsx(_components.strong,{children:`Emails not received`}),`: Check the recipient’s spam folder, and confirm your domain has SPF/DKIM records set up with your provider.`]}),`\n`]}),`\n`,_jsx(Heading,{level:`2`,id:`related-articles`,children:`Related Articles`}),`\n`,_jsxs(_components.ul,{children:[`\n`,_jsxs(_components.li,{children:[_jsx(_components.a,{href:`/white-label/agency-branding`,children:`Agency Branding`}),`: the rest of your brand identity`]}),`\n`,_jsxs(_components.li,{children:[_jsx(_components.a,{href:`/white-label/custom-domain`,children:`Custom Domain`}),`: matching your domain in the platform URL`]}),`\n`,_jsxs(_components.li,{children:[_jsx(_components.a,{href:`/integrations/mailgun`,children:`Mailgun`}),` · `,_jsx(_components.a,{href:`/integrations/postmark`,children:`Postmark`}),` · `,_jsx(_components.a,{href:`/integrations/smtp`,children:`SMTP`}),`: provider-specific integration references`]}),`\n`]})]})}function MDXContent(props={}){const{wrapper:MDXLayout}={..._provideComponents(),...props.components};return MDXLayout?_jsx(MDXLayout,{...props,children:_jsx(_createMdxContent,{...props})}):_createMdxContent(props)}return{default:MDXContent};function _missingMdxReference(id,component){throw new Error(`Expected `+(component?`component`:`object`)+\" `\"+id+\"` to be defined: you likely forgot to import, pass, or provide it.\")}","frontmatter":{},"scope":{"config":{},"pageMetadata":{"title":"Custom Email","description":"Send platform emails from your own domain using Mailgun, Postmark, Sendgrid, or SMTP.","icon":"at","href":"/white-label/custom-email"}}},"mdxSourceWithNoJs":null},"mdxExtracts":{"tableOfContents":[{"title":"Overview","slug":"overview","depth":2,"children":[]},{"title":"Prerequisites","slug":"prerequisites","depth":2,"children":[]},{"title":"Steps","slug":"steps","depth":2,"children":[]},{"title":"Troubleshooting","slug":"troubleshooting","depth":2,"children":[]},{"title":"Related Articles","slug":"related-articles","depth":2,"children":[]}],"codeExamples":{}},"jsLinks":[],"subdomain":"vapifybykanzucode","siteName":"Vapify Documentation","title":"Custom Email - Vapify Documentation","navMaps":{"firstHrefInVersion":{},"firstHrefInLanguage":{}},"lastModified":"2026-07-24T15:38:53.185Z","originalFileLocation":"white-label/custom-email.mdx"},"headHtml":"\u003cscript data-mint-head>(function(){var d=document.documentElement,p=null;if(!p){try{p=localStorage.getItem(\"isDarkMode\")}catch(e){}if(p==='true')p='dark';else if(p==='false')p='light';if(p!=='light'\u0026\u0026p!=='dark'\u0026\u0026p!=='system')p=\"system\"}var r=p==='system'?(matchMedia(\"(prefers-color-scheme: dark)\").matches?'dark':'light'):p;d.classList.remove(r==='dark'?'light':'dark');d.classList.add(r);d.setAttribute(\"data-theme-preference\",p)})();\u003c/script>\u003cmeta data-mint-head name=\"description\" content=\"Send platform emails from your own domain using Mailgun, Postmark, Sendgrid, or SMTP.\">\u003cmeta data-mint-head name=\"application-name\" content=\"Vapify Documentation\">\u003cmeta data-mint-head name=\"generator\" content=\"Mintlify\">\u003clink data-mint-head rel=\"icon\" type=\"image/png\" sizes=\"192x192\" href=\"/mintlify-assets/_mintlify/favicons/vapifybykanzucode/w584CEFqt3RJcGX5/_generated/favicon/android-chrome-192x192.png\" media=\"(prefers-color-scheme: light)\">\u003clink data-mint-head rel=\"apple-touch-icon\" type=\"image/png\" sizes=\"180x180\" href=\"/mintlify-assets/_mintlify/favicons/vapifybykanzucode/w584CEFqt3RJcGX5/_generated/favicon/apple-touch-icon.png\">\u003clink data-mint-head rel=\"icon\" type=\"image/png\" sizes=\"16x16\" href=\"/mintlify-assets/_mintlify/favicons/vapifybykanzucode/w584CEFqt3RJcGX5/_generated/favicon/favicon-16x16.png\" media=\"(prefers-color-scheme: light)\">\u003clink data-mint-head rel=\"icon\" type=\"image/png\" sizes=\"32x32\" href=\"/mintlify-assets/_mintlify/favicons/vapifybykanzucode/w584CEFqt3RJcGX5/_generated/favicon/favicon-32x32.png\" media=\"(prefers-color-scheme: light)\">\u003clink data-mint-head rel=\"shortcut icon\" type=\"image/x-icon\" href=\"/mintlify-assets/_mintlify/favicons/vapifybykanzucode/w584CEFqt3RJcGX5/_generated/favicon/favicon.ico\" media=\"(prefers-color-scheme: light)\">\u003clink data-mint-head rel=\"icon\" type=\"image/png\" sizes=\"192x192\" href=\"/mintlify-assets/_mintlify/favicons/vapifybykanzucode/w584CEFqt3RJcGX5/_generated/favicon-dark/android-chrome-192x192.png\" media=\"(prefers-color-scheme: dark)\">\u003clink data-mint-head rel=\"icon\" type=\"image/png\" sizes=\"16x16\" href=\"/mintlify-assets/_mintlify/favicons/vapifybykanzucode/w584CEFqt3RJcGX5/_generated/favicon-dark/favicon-16x16.png\" media=\"(prefers-color-scheme: dark)\">\u003clink data-mint-head rel=\"icon\" type=\"image/png\" sizes=\"32x32\" href=\"/mintlify-assets/_mintlify/favicons/vapifybykanzucode/w584CEFqt3RJcGX5/_generated/favicon-dark/favicon-32x32.png\" media=\"(prefers-color-scheme: dark)\">\u003clink data-mint-head rel=\"shortcut icon\" type=\"image/x-icon\" href=\"/mintlify-assets/_mintlify/favicons/vapifybykanzucode/w584CEFqt3RJcGX5/_generated/favicon-dark/favicon.ico\" media=\"(prefers-color-scheme: dark)\">\u003cmeta data-mint-head property=\"og:title\" content=\"Custom Email - Vapify Documentation\">\u003cmeta data-mint-head property=\"og:description\" content=\"Send platform emails from your own domain using Mailgun, Postmark, Sendgrid, or SMTP.\">\u003cmeta data-mint-head property=\"og:site_name\" content=\"Vapify Documentation\">\u003cmeta data-mint-head property=\"og:url\" content=\"https://docs.vapify.agency/white-label/custom-email\">\u003cmeta data-mint-head property=\"og:type\" content=\"website\">\u003cmeta data-mint-head property=\"og:image\" content=\"https://vapifybykanzucode.mintlify.app/_mintlify/api/og/v2?division=White+Label\u0026amp;title=Custom+Email\u0026amp;description=Send+platform+emails+from+your+own+domain+using+Mailgun%2C+Postmark%2C+Sendgrid%2C+or+SMTP.\u0026amp;theme=ec7729ededaad4d809dc6e44\u0026amp;signature=55211da0f540694e21cd65981e0accc98e75e2fe8a78360cae479a756ade66e8\">\u003cmeta data-mint-head property=\"og:image:width\" content=\"1200\">\u003cmeta data-mint-head property=\"og:image:height\" content=\"630\">\u003cmeta data-mint-head name=\"twitter:card\" content=\"summary_large_image\">\u003cmeta data-mint-head name=\"twitter:title\" content=\"Custom Email - Vapify Documentation\">\u003cmeta data-mint-head name=\"twitter:description\" content=\"Send platform emails from your own domain using Mailgun, Postmark, Sendgrid, or SMTP.\">\u003cmeta data-mint-head name=\"twitter:image\" content=\"https://vapifybykanzucode.mintlify.app/_mintlify/api/og/v2?division=White+Label\u0026amp;title=Custom+Email\u0026amp;description=Send+platform+emails+from+your+own+domain+using+Mailgun%2C+Postmark%2C+Sendgrid%2C+or+SMTP.\u0026amp;theme=ec7729ededaad4d809dc6e44\u0026amp;signature=55211da0f540694e21cd65981e0accc98e75e2fe8a78360cae479a756ade66e8\">\u003cmeta data-mint-head name=\"twitter:image:width\" content=\"1200\">\u003cmeta data-mint-head name=\"twitter:image:height\" content=\"630\">\u003cmeta data-mint-head name=\"msapplication-config\" content=\"/mintlify-assets/_mintlify/favicons/vapifybykanzucode/w584CEFqt3RJcGX5/_generated/favicon/browserconfig.xml\">\u003cmeta data-mint-head name=\"apple-mobile-web-app-title\" content=\"Vapify Documentation\">\u003cmeta data-mint-head name=\"msapplication-TileColor\" content=\"#CC6CE5\">\u003clink data-mint-head rel=\"canonical\" href=\"https://docs.vapify.agency/white-label/custom-email\">\u003clink data-mint-head rel=\"alternate\" type=\"application/xml\" href=\"/sitemap.xml\">\u003clink data-mint-head rel=\"alternate\" type=\"text/markdown\" href=\"/white-label/custom-email.md\">\u003cscript data-mint-head type=\"application/ld+json\">{\"@context\":\"https://schema.org\",\"@graph\":[{\"@type\":\"Organization\",\"@id\":\"https://docs.vapify.agency/#organization\",\"name\":\"Vapify Documentation\",\"url\":\"https://docs.vapify.agency\",\"logo\":{\"@type\":\"ImageObject\",\"url\":\"https://mintcdn.com/vapifybykanzucode/w9nx1mezgBOVwlhx/logo/vapify-logo.png?fit=max\u0026auto=format\u0026n=w9nx1mezgBOVwlhx\u0026q=85\u0026s=a41c5eb26b97ea79ec359f653c0c3bcf\"}},{\"@type\":\"WebSite\",\"@id\":\"https://docs.vapify.agency#website\",\"name\":\"Vapify Documentation\",\"url\":\"https://docs.vapify.agency\",\"publisher\":{\"@id\":\"https://docs.vapify.agency/#organization\"}},{\"@type\":\"WebPage\",\"@id\":\"https://docs.vapify.agency/white-label/custom-email#webpage\",\"url\":\"https://docs.vapify.agency/white-label/custom-email\",\"name\":\"Custom Email\",\"description\":\"Send platform emails from your own domain using Mailgun, Postmark, Sendgrid, or SMTP.\",\"dateModified\":\"2026-07-24T15:38:53.185Z\",\"isPartOf\":{\"@id\":\"https://docs.vapify.agency#website\"},\"breadcrumb\":{\"@id\":\"https://docs.vapify.agency/white-label/custom-email#breadcrumb\"}},{\"@type\":\"BreadcrumbList\",\"@id\":\"https://docs.vapify.agency/white-label/custom-email#breadcrumb\",\"itemListElement\":[{\"@type\":\"ListItem\",\"position\":1,\"name\":\"Customize \u0026 Integrate\",\"item\":\"https://docs.vapify.agency/white-label/agency-branding\"},{\"@type\":\"ListItem\",\"position\":2,\"name\":\"White Label\",\"item\":\"https://docs.vapify.agency/white-label/agency-branding\"},{\"@type\":\"ListItem\",\"position\":3,\"name\":\"Custom Email\",\"item\":\"https://docs.vapify.agency/white-label/custom-email\"}]},{\"@type\":[\"Article\",\"TechArticle\"],\"@id\":\"https://docs.vapify.agency/white-label/custom-email#article\",\"headline\":\"Custom Email\",\"name\":\"Custom Email\",\"description\":\"Send platform emails from your own domain using Mailgun, Postmark, Sendgrid, or SMTP.\",\"url\":\"https://docs.vapify.agency/white-label/custom-email\",\"mainEntityOfPage\":{\"@id\":\"https://docs.vapify.agency/white-label/custom-email#webpage\"},\"dateModified\":\"2026-07-24T15:38:53.185Z\",\"publisher\":{\"@id\":\"https://docs.vapify.agency/#organization\"},\"isPartOf\":{\"@id\":\"https://docs.vapify.agency#website\"}}]}\u003c/script>\u003cscript data-mint-head type=\"application/ld+json\">{\"@context\":\"https://schema.org\",\"@type\":\"WebSite\",\"name\":\"Vapify Documentation\",\"creator\":{\"@type\":\"Organization\",\"name\":\"Mintlify\",\"url\":\"https://mintlify.com\"}}\u003c/script>","siteName":"Vapify Documentation","nav":{"global":{"anchors":[{"anchor":"Main Site","icon":"globe","href":"https://vapify.agency"}]},"anchors":[{"anchor":"Documentation","icon":"book-open","groups":[{"group":"Get Started","pages":[{"group":"Start Here","expanded":true,"pages":[{"title":"Welcome to Vapify","icon":"door-open","href":"/start-here/welcome"},{"title":"What is Vapify?","icon":"lightbulb","href":"/start-here/what-is-vapify"},{"title":"Quick Start","icon":"bolt","href":"/start-here/quick-start"},{"title":"Platform Overview","icon":"layer-group","href":"/start-here/platform-overview"},{"title":"How Vapify Works","icon":"diagram-project","href":"/start-here/how-vapify-works"},{"title":"Glossary","icon":"book","href":"/start-here/glossary"}]},{"group":"Getting Started","pages":[{"title":"Brand Your Agency","icon":"palette","href":"/getting-started/brand-your-agency"},{"title":"Connect Your AI Provider","icon":"plug","href":"/getting-started/connect-your-ai-provider"},{"title":"Connect Stripe","icon":"credit-card","href":"/getting-started/connect-stripe"},{"title":"Create Your First Client","icon":"user-plus","href":"/getting-started/create-your-first-client"},{"title":"Assign an AI Assistant","icon":"robot","href":"/getting-started/assign-an-ai-assistant"},{"title":"Configure Pricing","icon":"tag","href":"/getting-started/configure-pricing"},{"title":"Invite Your Client","icon":"envelope","href":"/getting-started/invite-your-client"},{"title":"Launch Your Agency","icon":"rocket","href":"/getting-started/launch-your-agency"}]}]},{"group":"Operate","pages":[{"group":"Running Your Agency","pages":[{"title":"Dashboard","icon":"gauge-high","href":"/running-your-agency/dashboard"},{"title":"Calendar","icon":"calendar","href":"/integrations/calendar"},{"title":"Clients","icon":"users","href":"/running-your-agency/clients"},{"title":"Understanding Sub Accounts","icon":"sitemap","href":"/running-your-agency/understanding-sub-accounts"},{"title":"AI Assistants","icon":"robot","href":"/running-your-agency/ai-assistants"},{"title":"Phone Numbers","icon":"phone","href":"/running-your-agency/phone-numbers"},{"title":"Call Logs","icon":"clipboard-list","href":"/running-your-agency/call-logs"},{"title":"Contacts","icon":"address-book","href":"/running-your-agency/contacts"},{"title":"Analytics","icon":"chart-line","href":"/running-your-agency/analytics"},{"title":"Usage","icon":"chart-pie","href":"/running-your-agency/usage"},{"title":"Notifications","icon":"bell","href":"/running-your-agency/notifications"}]},{"group":"Billing","pages":[{"title":"How Billing Works","icon":"money-bill-wave","href":"/billing/how-billing-works"},{"title":"Stripe Integration","icon":"credit-card","href":"/billing/stripe-integration"},{"title":"Pricing Models","icon":"tags","href":"/billing/pricing-models"},{"title":"Wallet \u0026 Credits","icon":"wallet","href":"/billing/wallet-credits"},{"title":"Invoices","icon":"file-invoice-dollar","href":"/billing/invoices"},{"title":"Profit Tracking","icon":"coins","href":"/billing/profit-tracking"}]},{"group":"Team Management","pages":[{"title":"Users","icon":"users","href":"/team-management/users"},{"title":"Roles","icon":"user-tag","href":"/team-management/roles"},{"title":"Permissions","icon":"user-lock","href":"/team-management/permissions"},{"title":"Inviting Team Members","icon":"user-plus","href":"/team-management/inviting-team-members"}]}]},{"group":"Customize \u0026 Integrate","pages":[{"group":"White Label","pages":[{"title":"Agency Branding","icon":"palette","href":"/white-label/agency-branding"},{"title":"Custom Domain","description":"Host Vapify on your own subdomain instead of app.vapify.agency.","icon":"globe","href":"/white-label/custom-domain"},{"title":"Custom Email","icon":"at","href":"/white-label/custom-email"},{"title":"Custom Login","description":"How your login page reflects your branding and subdomain.","icon":"right-to-bracket","href":"/white-label/custom-login"},{"title":"Client Experience","icon":"user-check","href":"/white-label/client-experience"}]},{"group":"Integrations","pages":[{"title":"Vapi","icon":"microphone","href":"/integrations/vapi"},{"title":"Retell AI","icon":"microphone-lines","href":"/integrations/retell"},{"title":"Stripe","icon":"credit-card","href":"/integrations/stripe"},{"title":"GoHighLevel","icon":"arrows-rotate","href":"/integrations/gohighlevel"},{"title":"SMTP","icon":"server","href":"/integrations/smtp"},{"title":"Mailgun","icon":"envelope","href":"/integrations/mailgun"},{"title":"Postmark","icon":"paper-plane","href":"/integrations/postmark"}]}]},{"group":"Reference","pages":[{"group":"Guides","pages":[{"title":"Launch Your First AI Agency","icon":"rocket","href":"/guides/launch-your-first-ai-agency"},{"title":"Onboard Your First Client","icon":"handshake","href":"/guides/onboard-your-first-client"},{"title":"Migrate Existing Clients","icon":"arrow-right-arrow-left","href":"/guides/migrate-existing-clients"},{"title":"Charge Monthly Plans","icon":"calendar-days","href":"/guides/charge-monthly-plans"},{"title":"Charge Per Minute","icon":"stopwatch","href":"/guides/charge-per-minute"},{"title":"Manage Multiple Clients","icon":"people-group","href":"/guides/manage-multiple-clients"},{"title":"White Label Best Practices","icon":"wand-magic-sparkles","href":"/guides/white-label-best-practices"},{"title":"Recommended Agency Workflow","icon":"route","href":"/guides/recommended-agency-workflow"}]},{"group":"Help","pages":[{"title":"Troubleshooting","icon":"screwdriver-wrench","href":"/help/troubleshooting"},{"title":"Frequently Asked Questions","icon":"circle-question","href":"/help/frequently-asked-questions"},{"title":"Contact Support","icon":"headset","href":"/help/contact-support"}]},{"group":"API Reference","pages":[{"title":"Calendar API","icon":"code","href":"/api-reference/introduction"},{"title":"Calendar Endpoints","icon":"calendar","href":"/api-reference/calendar-endpoints"}]}]}]}]},"title":"Custom Email - Vapify Documentation","buildId":"dpl_5UDDZ9hnigTkoV7QtvQ39eUp84nu","deploymentId":"dpl_5UDDZ9hnigTkoV7QtvQ39eUp84nu","dynamics":["a74be98ba7"],"chunks":["zoom-image-lightbox-ChyC7Hte.js","PlusIcon-DXkY3IBj.js","lightbox-handle-r17bVUz3.js"]}