> ## Documentation Index
> Fetch the complete documentation index at: https://docs.vapify.agency/llms.txt
> Use this file to discover all available pages before exploring further.
# Agency Settings
> Configure your agency branding, custom domain, and email settings in Vapify.
## Overview
Agency Settings is your control center for customizing how Vapify appears to you and your clients. From this central location, you can configure your agency's branding, set up a custom subdomain, and establish email communication settings. These settings ensure that your clients experience your brand, not Vapify's, throughout their entire interaction with the platform.
**To access Agency Settings:**
Navigate to **Agency Settings** from the sidebar menu in your Vapify dashboard.
### What You Can Configure
The Agency Settings page is organized into three tabs:
1. **Agency Tab** - Brand your platform with your agency name, logo, and favicon (Available on all plans)
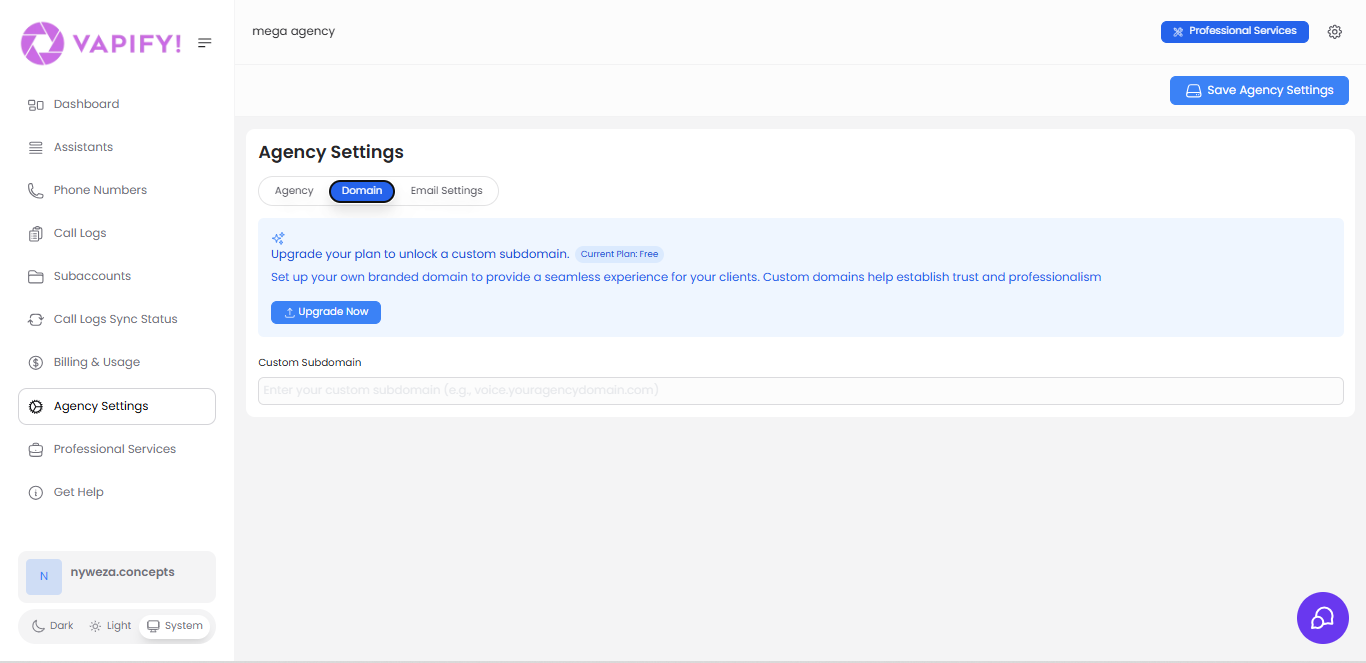
2. **Domain Tab** - Set up a custom subdomain for professional branding (Requires paid plan)
3. **Email Settings Tab** - Configure custom email provider for brand consistency (Requires paid plan)
Some features require a paid plan (Starter, Business, Scale, or Partner). Free plan users can still configure essential branding elements like agency name, logo, and favicon.
***
## Agency Branding
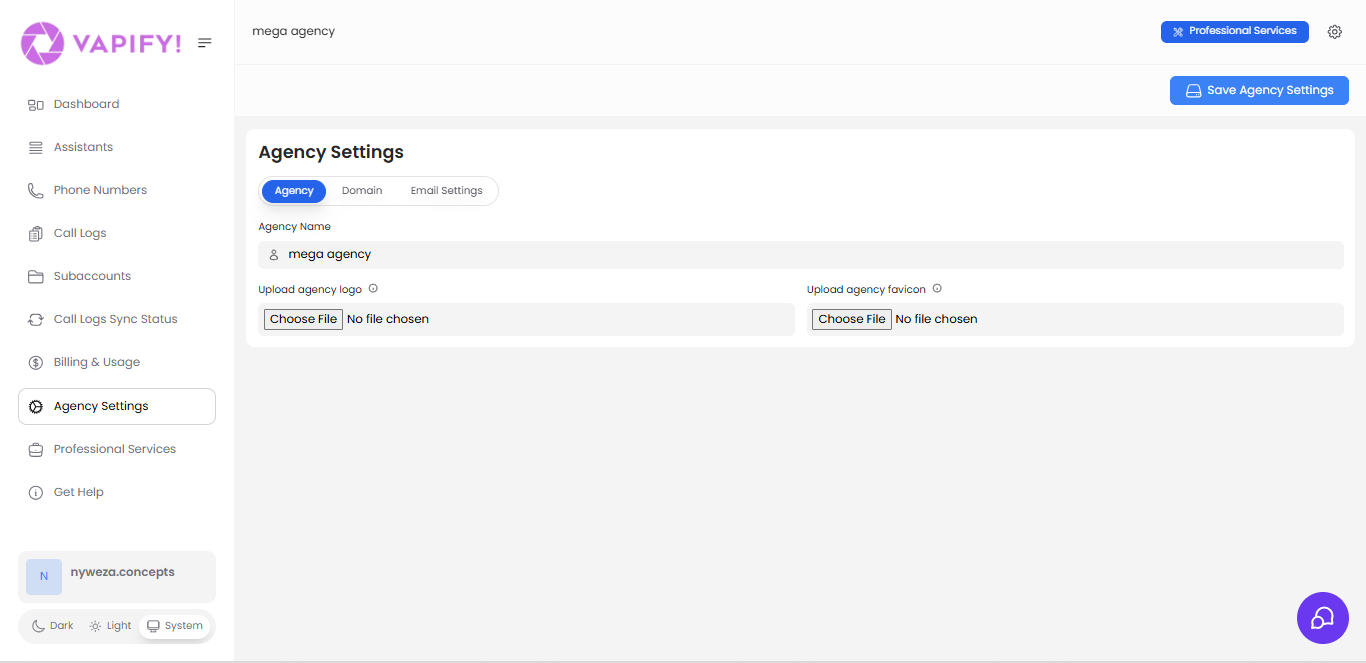
The Agency tab contains essential branding settings that personalize the Vapify platform with your agency's identity. These settings are available on all plans, including the Free plan.
 ### Agency Name
Your agency name appears throughout the platform in various locations:
* Dashboard header and navigation
* Client-facing dashboards
* Email communications
* Login pages
* Invoices and billing documents
**To set your agency name:**
1. Navigate to **Agency Settings** → **Agency tab**
2. Enter your agency name in the **Agency Name** field
3. Click **Save Agency Settings**
Use your registered business name for professionalism and brand consistency. This name will be visible to all your clients, so choose something that reflects your brand identity.
### Agency Logo
Your logo is the visual centerpiece of your branding and appears in multiple places:
* Top-left corner of the dashboard
* Client dashboards
* Email headers
* Loading screens
* Printed documents
**Recommended logo specifications:**
* **Format**: PNG with transparent background (recommended) or JPG
* **Minimum size**: 200x200 pixels
* **Recommended size**: 400x400 pixels or larger for high-resolution displays
* **Aspect ratio**: Square (1:1) or horizontal (2:1 or 3:1)
* **File size**: Under 2MB for optimal loading
**To upload your logo:**
1. Navigate to **Agency Settings** → **Agency tab**
2. Click **Choose File** under "Upload agency logo"
3. Select your logo file from your computer
4. Click **Save Agency Settings**
Use a high-resolution logo to ensure it looks sharp on all devices. A transparent background (PNG format) allows your logo to blend seamlessly with different interface themes.
### Favicon
The favicon is the small icon that appears in browser tabs when users access your platform. While small, it's an important branding element that helps users identify your platform among multiple open tabs.
**Favicon specifications:**
* **Format**: ICO or PNG
* **Size**: 16x16 pixels or 32x32 pixels
* **Design**: Simple and recognizable at small sizes
* **File size**: Under 100KB
**To upload your favicon:**
1. Navigate to **Agency Settings** → **Agency tab**
2. Click **Choose File** under "Upload agency favicon"
3. Select your favicon file
4. Click **Save Agency Settings**
Keep your favicon design simple. Complex logos may not be recognizable at 16x16 pixels. Consider using your logo's icon or initial letter.
### Applying Your Branding Changes
After uploading your agency name, logo, and favicon:
1. Click the **Save Agency Settings** button in the top-right corner
2. You'll see a confirmation message that settings have been saved
3. **Important**: Log out and log back in to see your changes reflected across the platform
Changes to your logo and favicon require a logout/login cycle to take effect. After saving, log out of your account and log back in to see your branding updates.
***
## Custom Subdomain
Custom subdomains allow you to host the Vapify platform on your own domain, providing a seamless branded experience for your clients. Instead of accessing the platform at `app.vapify.agency`, your clients can log in at `voice.youragency.com` or any custom subdomain you choose.
### Agency Name
Your agency name appears throughout the platform in various locations:
* Dashboard header and navigation
* Client-facing dashboards
* Email communications
* Login pages
* Invoices and billing documents
**To set your agency name:**
1. Navigate to **Agency Settings** → **Agency tab**
2. Enter your agency name in the **Agency Name** field
3. Click **Save Agency Settings**
Use your registered business name for professionalism and brand consistency. This name will be visible to all your clients, so choose something that reflects your brand identity.
### Agency Logo
Your logo is the visual centerpiece of your branding and appears in multiple places:
* Top-left corner of the dashboard
* Client dashboards
* Email headers
* Loading screens
* Printed documents
**Recommended logo specifications:**
* **Format**: PNG with transparent background (recommended) or JPG
* **Minimum size**: 200x200 pixels
* **Recommended size**: 400x400 pixels or larger for high-resolution displays
* **Aspect ratio**: Square (1:1) or horizontal (2:1 or 3:1)
* **File size**: Under 2MB for optimal loading
**To upload your logo:**
1. Navigate to **Agency Settings** → **Agency tab**
2. Click **Choose File** under "Upload agency logo"
3. Select your logo file from your computer
4. Click **Save Agency Settings**
Use a high-resolution logo to ensure it looks sharp on all devices. A transparent background (PNG format) allows your logo to blend seamlessly with different interface themes.
### Favicon
The favicon is the small icon that appears in browser tabs when users access your platform. While small, it's an important branding element that helps users identify your platform among multiple open tabs.
**Favicon specifications:**
* **Format**: ICO or PNG
* **Size**: 16x16 pixels or 32x32 pixels
* **Design**: Simple and recognizable at small sizes
* **File size**: Under 100KB
**To upload your favicon:**
1. Navigate to **Agency Settings** → **Agency tab**
2. Click **Choose File** under "Upload agency favicon"
3. Select your favicon file
4. Click **Save Agency Settings**
Keep your favicon design simple. Complex logos may not be recognizable at 16x16 pixels. Consider using your logo's icon or initial letter.
### Applying Your Branding Changes
After uploading your agency name, logo, and favicon:
1. Click the **Save Agency Settings** button in the top-right corner
2. You'll see a confirmation message that settings have been saved
3. **Important**: Log out and log back in to see your changes reflected across the platform
Changes to your logo and favicon require a logout/login cycle to take effect. After saving, log out of your account and log back in to see your branding updates.
***
## Custom Subdomain
Custom subdomains allow you to host the Vapify platform on your own domain, providing a seamless branded experience for your clients. Instead of accessing the platform at `app.vapify.agency`, your clients can log in at `voice.youragency.com` or any custom subdomain you choose.
 ### Benefits of a Custom Subdomain
* **Professional Branding**: Clients access your platform through your domain
* **Trust and Credibility**: Your domain establishes authenticity
* **Brand Consistency**: Complete white-label experience
* **Seamless Experience**: Clients never see Vapify branding in the URL
### Plan Requirements
Custom subdomains are available on Starter, Business, Scale, and Partner plans. This feature is not available on the Free plan.
**Free Plan users:**
* Access Vapify at the default URL: `app.vapify.agency`
* All functionality works the same, just without custom domain branding
* Upgrade to a paid plan to unlock custom subdomain features
**To upgrade your plan:**
Contact support at [support@info.vapify.agency](mailto:support@info.vapify.agency) or visit the Billing & Usage and click adjust plan.
### Setting Up Your Custom Subdomain
If you're on a paid plan, follow these steps to configure your custom subdomain:
#### Step 1: Choose Your Subdomain
Decide on a subdomain for your Vapify installation. We currently support:
* `voice.youragency.com`
Choose a subdomain that's professional, memorable, and clearly related to voice AI or your service offering. Avoid overly complex or confusing subdomain names.
#### Step 2: Configure DNS (CNAME Record)
You'll need to create a CNAME record with your DNS provider. A CNAME record tells the internet that your subdomain points to Vapify's servers.
**What is a CNAME record?**
A CNAME (Canonical Name) record is a type of DNS record that maps one domain name (your subdomain) to another domain name (Vapify's servers). Think of it as a forwarding address for your subdomain.
**Where to configure DNS:**
Your DNS settings are managed through your domain registrar or DNS provider. Common providers include:
* **Cloudflare** - cloudflare.com/dns
* **GoDaddy** - dnsmanagement.godaddy.com
* **Namecheap** - namecheap.com → Domain List → Manage → Advanced DNS
* **Google Domains** - domains.google.com
* **AWS Route 53** - console.aws.amazon.com/route53
**CNAME record settings:**
When creating your CNAME record, use these settings:
| Field | Value |
| ------------------- | -------------------------------------------------------- |
| **Type** | CNAME |
| **Name/Host** | Your subdomain (e.g., "voice" or "voice.youragency.com") |
| **Value/Points to** | Provided by Vapify support |
| **TTL** | Auto or 3600 (1 hour) |
The exact "Value/Points to" address will be provided by Vapify support when you set up your subdomain. Contact [support@info.vapify.agency](mailto:support@info.vapify.agency) to receive your unique CNAME target.
**Example CNAME configuration:**
```
Type: CNAME
Name: voice
Points to: vapify-customer-123.vapify.agency
TTL: 3600
```
#### Step 3: Verify in Vapify
Once you've created the CNAME record:
1. Navigate to **Agency Settings** → **Domain tab**
2. Enter your full subdomain (e.g., `voice.youragency.com`) in the **Custom Subdomain** field
3. Click **Verify Domain**
Vapify will check if your CNAME record is properly configured.
DNS propagation can take anywhere from a few minutes to 48 hours. If verification fails immediately, wait 1-2 hours and try again. DNS changes need time to propagate across the internet.
#### Step 4: Confirmation
Once your subdomain is verified:
* You'll receive an email confirmation
* Your custom subdomain will be active
* You and your clients can access Vapify at your custom URL
* The default `app.vapify.agency` URL will continue to work
**Testing your subdomain:**
1. Open a new browser window
2. Navigate to your custom subdomain (e.g., `https://voice.youragency.com`)
3. You should see the Vapify login page with your branding
### Troubleshooting Subdomain Issues
**Domain verification failing?**
* Wait 1-2 hours for DNS propagation
* Verify your CNAME record is created correctly
* Check that you're not using an A record instead of CNAME
* Ensure there are no typos in your CNAME configuration
* Try using a DNS checker tool (e.g., whatsmydns.net)
**Subdomain not loading?**
* Clear your browser cache
* Try accessing in incognito/private mode
* Wait for full DNS propagation (up to 48 hours)
* Verify the CNAME target provided by Vapify is correct
**Need help?**
Contact Vapify support at [support@info.vapify.agency](mailto:support@info.vapify.agency) with your subdomain details.
***
## Email Configuration
Custom email settings allow you to send platform emails from your own email domain and provider, maintaining complete brand consistency. All system emails (invitations, notifications, password resets) will come from your domain instead of Vapify's.
### Benefits of a Custom Subdomain
* **Professional Branding**: Clients access your platform through your domain
* **Trust and Credibility**: Your domain establishes authenticity
* **Brand Consistency**: Complete white-label experience
* **Seamless Experience**: Clients never see Vapify branding in the URL
### Plan Requirements
Custom subdomains are available on Starter, Business, Scale, and Partner plans. This feature is not available on the Free plan.
**Free Plan users:**
* Access Vapify at the default URL: `app.vapify.agency`
* All functionality works the same, just without custom domain branding
* Upgrade to a paid plan to unlock custom subdomain features
**To upgrade your plan:**
Contact support at [support@info.vapify.agency](mailto:support@info.vapify.agency) or visit the Billing & Usage and click adjust plan.
### Setting Up Your Custom Subdomain
If you're on a paid plan, follow these steps to configure your custom subdomain:
#### Step 1: Choose Your Subdomain
Decide on a subdomain for your Vapify installation. We currently support:
* `voice.youragency.com`
Choose a subdomain that's professional, memorable, and clearly related to voice AI or your service offering. Avoid overly complex or confusing subdomain names.
#### Step 2: Configure DNS (CNAME Record)
You'll need to create a CNAME record with your DNS provider. A CNAME record tells the internet that your subdomain points to Vapify's servers.
**What is a CNAME record?**
A CNAME (Canonical Name) record is a type of DNS record that maps one domain name (your subdomain) to another domain name (Vapify's servers). Think of it as a forwarding address for your subdomain.
**Where to configure DNS:**
Your DNS settings are managed through your domain registrar or DNS provider. Common providers include:
* **Cloudflare** - cloudflare.com/dns
* **GoDaddy** - dnsmanagement.godaddy.com
* **Namecheap** - namecheap.com → Domain List → Manage → Advanced DNS
* **Google Domains** - domains.google.com
* **AWS Route 53** - console.aws.amazon.com/route53
**CNAME record settings:**
When creating your CNAME record, use these settings:
| Field | Value |
| ------------------- | -------------------------------------------------------- |
| **Type** | CNAME |
| **Name/Host** | Your subdomain (e.g., "voice" or "voice.youragency.com") |
| **Value/Points to** | Provided by Vapify support |
| **TTL** | Auto or 3600 (1 hour) |
The exact "Value/Points to" address will be provided by Vapify support when you set up your subdomain. Contact [support@info.vapify.agency](mailto:support@info.vapify.agency) to receive your unique CNAME target.
**Example CNAME configuration:**
```
Type: CNAME
Name: voice
Points to: vapify-customer-123.vapify.agency
TTL: 3600
```
#### Step 3: Verify in Vapify
Once you've created the CNAME record:
1. Navigate to **Agency Settings** → **Domain tab**
2. Enter your full subdomain (e.g., `voice.youragency.com`) in the **Custom Subdomain** field
3. Click **Verify Domain**
Vapify will check if your CNAME record is properly configured.
DNS propagation can take anywhere from a few minutes to 48 hours. If verification fails immediately, wait 1-2 hours and try again. DNS changes need time to propagate across the internet.
#### Step 4: Confirmation
Once your subdomain is verified:
* You'll receive an email confirmation
* Your custom subdomain will be active
* You and your clients can access Vapify at your custom URL
* The default `app.vapify.agency` URL will continue to work
**Testing your subdomain:**
1. Open a new browser window
2. Navigate to your custom subdomain (e.g., `https://voice.youragency.com`)
3. You should see the Vapify login page with your branding
### Troubleshooting Subdomain Issues
**Domain verification failing?**
* Wait 1-2 hours for DNS propagation
* Verify your CNAME record is created correctly
* Check that you're not using an A record instead of CNAME
* Ensure there are no typos in your CNAME configuration
* Try using a DNS checker tool (e.g., whatsmydns.net)
**Subdomain not loading?**
* Clear your browser cache
* Try accessing in incognito/private mode
* Wait for full DNS propagation (up to 48 hours)
* Verify the CNAME target provided by Vapify is correct
**Need help?**
Contact Vapify support at [support@info.vapify.agency](mailto:support@info.vapify.agency) with your subdomain details.
***
## Email Configuration
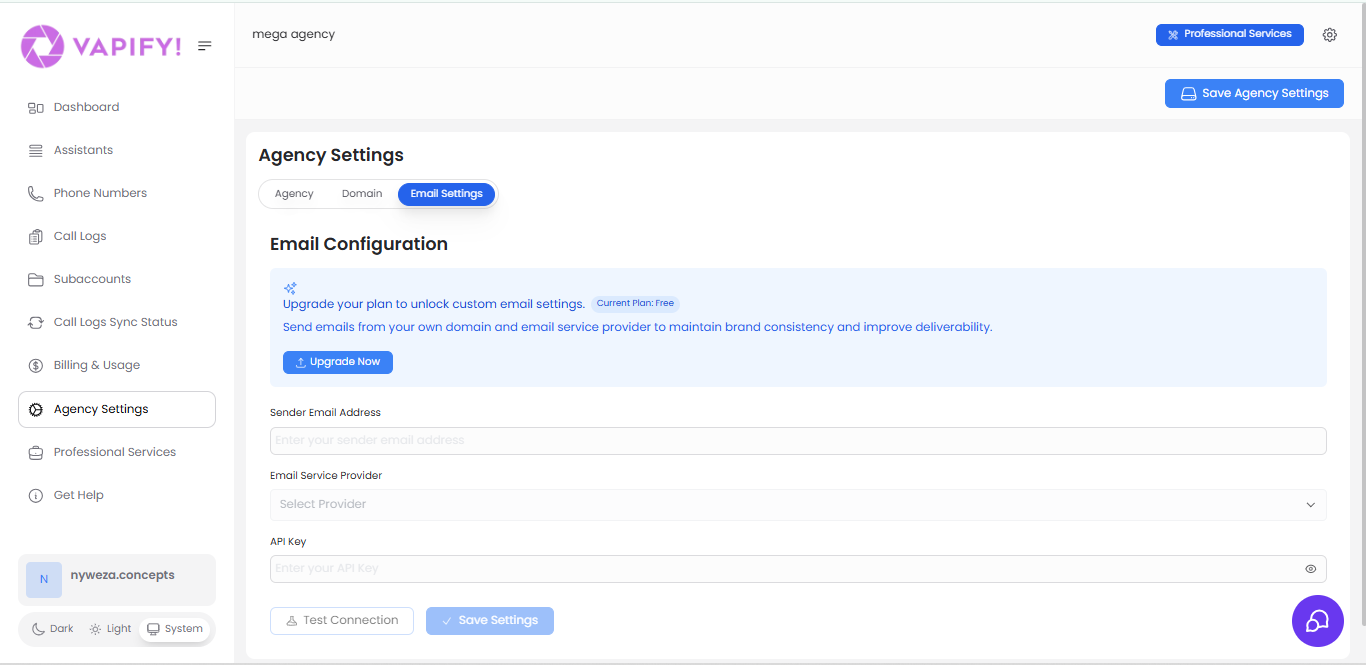
Custom email settings allow you to send platform emails from your own email domain and provider, maintaining complete brand consistency. All system emails (invitations, notifications, password resets) will come from your domain instead of Vapify's.
 ### Why Custom Email Settings Matter
**Brand Consistency:**
Clients receive emails from `support@youragency.com` instead of a Vapify address
**Improved Deliverability:**
Emails from your verified domain are less likely to be marked as spam
**Trust and Professionalism:**
Your domain in the "From" address establishes authenticity
**Better Client Experience:**
Clients can reply directly to your agency email address
### Plan Requirements
Custom email settings are available on paid plans (Starter, Business, Scale, Partner). This feature is not available on the Free plan.
**Free Plan users:**
* System emails are sent from Vapify's default email address
* All functionality works the same
* Upgrade to a paid plan to use your own email provider
**To upgrade:**
Contact support at [support@info.vapify.agency](mailto:support@info.vapify.agency) or visit Professional Services in your dashboard.
### Configuring Email Settings (Paid Plans)
If you're on a paid plan, you can configure your own email service provider. Vapify supports four email provider options:
#### Email Service Provider: Mailgun (Recommended)
Mailgun is a reliable email service provider that's easy to set up and offers excellent deliverability.
**Why Mailgun:**
* Easy setup process
* Generous free tier: 5,000 emails/month for 3 months
* Excellent deliverability rates
* Detailed analytics and logs
* Recommended by Vapify
**Setup steps:**
1. **Sign up for Mailgun**
Visit [mailgun.com](https://www.mailgun.com/) and create an account
2. **Verify your domain**
Add and verify your email domain in Mailgun's dashboard
3. **Get your API key**
* Navigate to **Settings** → **API Security** in Mailgun
* Copy your **Private API Key** (starts with "key-")
4. **Configure in Vapify**
* Go to **Agency Settings** → **Email Settings tab**
* Enter your sender email address (e.g., `support@youragency.com`)
* Select **Mailgun** from the Email Service Provider dropdown
* Paste your Private API Key in the **API Key** field
5. **Test and save**
* Click **Test Connection** to verify your settings
* If successful, click **Save Settings**
Mailgun's free tier is perfect for most agencies starting out. You get 5,000 emails per month for the first 3 months, which is typically more than enough for platform notifications.
#### Email Service Provider: Postmark (Recommended)
Postmark specializes in transactional emails with exceptional deliverability and support.
**Why Postmark:**
* Highest deliverability rates
* Simple, developer-friendly setup
* Free tier: 100 emails/month forever
* Excellent customer support
* Fast email delivery
**Setup steps:**
1. **Sign up for Postmark**
Visit [postmarkapp.com](https://postmarkapp.com/) and create an account
2. **Create a server**
In Postmark, create a new "Server" (this is their term for an email sending configuration)
3. **Get your Server API Token**
* Go to your server's **API Tokens** tab
* Copy the **Server API Token**
4. **Configure in Vapify**
* Go to **Agency Settings** → **Email Settings tab**
* Enter your sender email address
* Select **Postmark** from the Email Service Provider dropdown
* Paste your Server API Token in the **API Key** field
5. **Test and save**
* Click **Test Connection**
* Click **Save Settings** when successful
Postmark's free tier includes 100 emails per month permanently. For higher volumes, their paid plans start at \$15/month for 10,000 emails.
#### Email Service Provider: Sendgrid
Sendgrid is another popular email service provider with a generous free tier.
**Setup steps:**
1. **Sign up for Sendgrid**
Visit [sendgrid.com](https://sendgrid.com/) and create an account
2. **Create an API key**
* Navigate to **Settings** → **API Keys**
* Click **Create API Key**
* Give it full **Mail Send** permissions
* Copy the generated API key
3. **Configure in Vapify**
* Go to **Agency Settings** → **Email Settings tab**
* Enter your sender email address
* Select **Sendgrid** from the Email Service Provider dropdown
* Paste your API Key
4. **Test and save**
* Click **Test Connection**
* Click **Save Settings**
#### Email Service Provider: SMTP (Advanced)
SMTP (Simple Mail Transfer Protocol) is a universal email sending method. Use this option if you have an existing email server or want to use Google Workspace, Microsoft 365, or another email provider not listed above.
SMTP setup is more complex and requires technical knowledge. We recommend using Mailgun or Postmark unless you have specific requirements.
**When to use SMTP:**
* You have an existing email server
* You're using Google Workspace or Microsoft 365
* You need to use a specific email provider not supported natively
* Your organization has specific email compliance requirements
**Required SMTP settings:**
* **SMTP Server/Hostname**: Your email server address (e.g., smtp.gmail.com)
* **Port**: Typically 587 (TLS) or 465 (SSL)
* **Username**: Your full email address
* **Password**: Your email password or app-specific password
**Google Workspace SMTP Setup:**
If you're using Google Workspace (formerly G Suite):
1. **Generate an App Password** (Required for security):
* Go to your Google Account settings
* Navigate to **Security** → **2-Step Verification** → **App passwords**
* Generate a new app password for "Mail"
* Copy the 16-character password
2. **SMTP Settings for Google:**
* **SMTP Server**: `smtp.gmail.com`
* **Port**: `587`
* **Security**: TLS/STARTTLS
* **Username**: Your full Google Workspace email
* **Password**: The app password you generated (not your regular password)
3. **Configure in Vapify**:
* Enter these settings in the SMTP configuration fields
* Click **Test Connection**
* Click **Save Settings**
For Google Workspace, always use an app-specific password rather than your main account password. This is more secure and prevents authentication issues.
**Security Considerations for SMTP:**
* Never use your primary email password in third-party applications
* Always use app-specific passwords when available
* Use TLS/SSL encryption (port 587 or 465)
* Regularly rotate your app passwords
* Monitor your email account for suspicious activity
### Sender Email Address
Your sender email address is what recipients see in the "From" field when they receive emails from your Vapify platform.
**Best practices:**
* Use a professional email address on your domain (`support@youragency.com`, `hello@youragency.com`, `notifications@youragency.com`)
* Avoid generic addresses like `info@` unless that's your primary support email
* Ensure the email address matches your verified domain in your email provider
* Consider using a dedicated support address that your team monitors
### Testing Your Email Connection
Before saving your email settings, always test the connection to ensure everything is configured correctly.
**To test:**
1. Enter all your email settings (sender address, provider, API key)
2. Click **Test Connection** button
3. Wait for the test to complete (usually 5-10 seconds)
**If the test succeeds:**
* You'll see a green success message
* Click **Save Settings** to apply your configuration
* Your email settings are now active
**If the test fails:**
* Review the error message for specific details
* Common issues:
* Incorrect API key (check for typos)
* API key doesn't have proper permissions
* Sender email address not verified with provider
* Network connectivity issues
* Double-check your settings and try again
Always test your connection before saving. This ensures your email settings are correct and prevents issues with sending platform emails.
### Saving Email Settings
Once your test connection succeeds:
1. Click **Save Settings**
2. You'll see a confirmation message
3. All future platform emails will be sent through your configured provider
**What emails will be sent:**
* User invitation emails
* Password reset requests
* System notifications
* Billing and payment notifications
* Usage alerts and summaries
* Any other platform-generated emails
***
## Best Practices & Tips
### Branding Consistency Checklist
Ensure your agency branding is consistent across all touchpoints:
* [ ] Agency name matches your registered business name
* [ ] Logo is high-resolution and looks professional
* [ ] Favicon is simple and recognizable at small sizes
* [ ] Custom subdomain (if applicable) uses your primary domain
* [ ] Email sender address matches your support/contact email
* [ ] Logo displays correctly on both light and dark backgrounds
* [ ] All branding elements are saved and active
### Security Best Practices
**API Keys:**
* Never share your API keys publicly or commit them to version control
* Use environment variables or secure storage for sensitive credentials
* Rotate API keys periodically (every 6-12 months)
* Immediately regenerate keys if you suspect they've been compromised
* Use app-specific passwords for email when available
**Access Control:**
* Limit who has access to Agency Settings
* Use strong passwords for all accounts
* Enable two-factor authentication where possible
* Regularly audit who has administrative access
### Regular Maintenance
**Monthly checks:**
* Verify your logo and branding still appear correctly
* Test email deliverability by sending test notifications
* Check that your custom subdomain is still working
* Review email provider usage to ensure you're within limits
**Quarterly reviews:**
* Update logo or branding if your business rebrands
* Review and update email sender address if needed
* Audit API keys and rotate if necessary
* Check for any new features or settings available
***
## Troubleshooting Common Issues
### Logo or Favicon Not Appearing
**Possible causes:**
* Changes not applied yet (requires logout/login)
* Browser cache showing old version
* File size too large or format unsupported
**Solutions:**
1. Log out and log back in to your account
2. Clear your browser cache and hard refresh (Ctrl+Shift+R or Cmd+Shift+R)
3. Try uploading a smaller file size (under 2MB for logo, under 100KB for favicon)
4. Ensure you're using supported formats (PNG, JPG for logo; ICO or PNG for favicon)
5. Wait a few minutes for changes to propagate
### DNS/Subdomain Issues
**Subdomain verification failing:**
* Wait longer for DNS propagation (can take up to 48 hours)
* Verify CNAME record is created correctly with your DNS provider
* Check for typos in subdomain name or CNAME target
* Ensure you're using a CNAME record, not an A record
* Use a DNS propagation checker tool (whatsmydns.net)
**Subdomain not loading:**
* Clear browser cache
* Try incognito/private browsing mode
* Wait for full DNS propagation
* Verify SSL certificate is active (may take extra time)
* Check with your DNS provider that the record is active
### Email Deliverability Problems
**Emails not being received:**
* Check recipient's spam/junk folder
* Verify sender email address is correct
* Ensure your domain is verified with your email provider
* Test connection in Vapify settings
* Check your email provider's sending limits and usage
**Email bouncing back:**
* Verify sender address exists and can receive mail
* Check that recipient addresses are valid
* Ensure your domain has proper SPF and DKIM records
* Review bounce reason in your email provider's logs
* Contact your email provider's support if issues persist
### API Key Errors
**"Invalid API key" errors:**
* Double-check you copied the entire key (no spaces or extra characters)
* Verify you're using the correct type of key (e.g., Private API key for Mailgun)
* Ensure the API key has the correct permissions in your email provider
* Try regenerating the API key in your email provider
* Check if the key has been revoked or expired
**Connection timeout:**
* Check your internet connection
* Verify your firewall isn't blocking the connection
* Try again in a few minutes (temporary service issue)
* Contact Vapify support if the issue persists
***
## Need Help?
If you're experiencing issues with your agency settings that aren't covered in this guide:
**Contact Vapify Support:**
* Email: [support@info.vapify.agency](mailto:support@info.vapify.agency)
* Include screenshots of any error messages
* Describe what you've already tried
* Mention your plan type (Free, Starter, Business, etc.)
**Related Documentation:**
* [Quick Start Guide](/quickstart) - Step-by-step setup instructions
* [Billing & Usage](/features/billing-and-usage) - Configure payments and pricing
* [Subaccounts](/features/subaccount) - Manage client accounts
* [Assistants](/features/assistants) - Set up voice assistants
***
We're here to help you create a professional, fully-branded voice AI platform for your agency!
### Why Custom Email Settings Matter
**Brand Consistency:**
Clients receive emails from `support@youragency.com` instead of a Vapify address
**Improved Deliverability:**
Emails from your verified domain are less likely to be marked as spam
**Trust and Professionalism:**
Your domain in the "From" address establishes authenticity
**Better Client Experience:**
Clients can reply directly to your agency email address
### Plan Requirements
Custom email settings are available on paid plans (Starter, Business, Scale, Partner). This feature is not available on the Free plan.
**Free Plan users:**
* System emails are sent from Vapify's default email address
* All functionality works the same
* Upgrade to a paid plan to use your own email provider
**To upgrade:**
Contact support at [support@info.vapify.agency](mailto:support@info.vapify.agency) or visit Professional Services in your dashboard.
### Configuring Email Settings (Paid Plans)
If you're on a paid plan, you can configure your own email service provider. Vapify supports four email provider options:
#### Email Service Provider: Mailgun (Recommended)
Mailgun is a reliable email service provider that's easy to set up and offers excellent deliverability.
**Why Mailgun:**
* Easy setup process
* Generous free tier: 5,000 emails/month for 3 months
* Excellent deliverability rates
* Detailed analytics and logs
* Recommended by Vapify
**Setup steps:**
1. **Sign up for Mailgun**
Visit [mailgun.com](https://www.mailgun.com/) and create an account
2. **Verify your domain**
Add and verify your email domain in Mailgun's dashboard
3. **Get your API key**
* Navigate to **Settings** → **API Security** in Mailgun
* Copy your **Private API Key** (starts with "key-")
4. **Configure in Vapify**
* Go to **Agency Settings** → **Email Settings tab**
* Enter your sender email address (e.g., `support@youragency.com`)
* Select **Mailgun** from the Email Service Provider dropdown
* Paste your Private API Key in the **API Key** field
5. **Test and save**
* Click **Test Connection** to verify your settings
* If successful, click **Save Settings**
Mailgun's free tier is perfect for most agencies starting out. You get 5,000 emails per month for the first 3 months, which is typically more than enough for platform notifications.
#### Email Service Provider: Postmark (Recommended)
Postmark specializes in transactional emails with exceptional deliverability and support.
**Why Postmark:**
* Highest deliverability rates
* Simple, developer-friendly setup
* Free tier: 100 emails/month forever
* Excellent customer support
* Fast email delivery
**Setup steps:**
1. **Sign up for Postmark**
Visit [postmarkapp.com](https://postmarkapp.com/) and create an account
2. **Create a server**
In Postmark, create a new "Server" (this is their term for an email sending configuration)
3. **Get your Server API Token**
* Go to your server's **API Tokens** tab
* Copy the **Server API Token**
4. **Configure in Vapify**
* Go to **Agency Settings** → **Email Settings tab**
* Enter your sender email address
* Select **Postmark** from the Email Service Provider dropdown
* Paste your Server API Token in the **API Key** field
5. **Test and save**
* Click **Test Connection**
* Click **Save Settings** when successful
Postmark's free tier includes 100 emails per month permanently. For higher volumes, their paid plans start at \$15/month for 10,000 emails.
#### Email Service Provider: Sendgrid
Sendgrid is another popular email service provider with a generous free tier.
**Setup steps:**
1. **Sign up for Sendgrid**
Visit [sendgrid.com](https://sendgrid.com/) and create an account
2. **Create an API key**
* Navigate to **Settings** → **API Keys**
* Click **Create API Key**
* Give it full **Mail Send** permissions
* Copy the generated API key
3. **Configure in Vapify**
* Go to **Agency Settings** → **Email Settings tab**
* Enter your sender email address
* Select **Sendgrid** from the Email Service Provider dropdown
* Paste your API Key
4. **Test and save**
* Click **Test Connection**
* Click **Save Settings**
#### Email Service Provider: SMTP (Advanced)
SMTP (Simple Mail Transfer Protocol) is a universal email sending method. Use this option if you have an existing email server or want to use Google Workspace, Microsoft 365, or another email provider not listed above.
SMTP setup is more complex and requires technical knowledge. We recommend using Mailgun or Postmark unless you have specific requirements.
**When to use SMTP:**
* You have an existing email server
* You're using Google Workspace or Microsoft 365
* You need to use a specific email provider not supported natively
* Your organization has specific email compliance requirements
**Required SMTP settings:**
* **SMTP Server/Hostname**: Your email server address (e.g., smtp.gmail.com)
* **Port**: Typically 587 (TLS) or 465 (SSL)
* **Username**: Your full email address
* **Password**: Your email password or app-specific password
**Google Workspace SMTP Setup:**
If you're using Google Workspace (formerly G Suite):
1. **Generate an App Password** (Required for security):
* Go to your Google Account settings
* Navigate to **Security** → **2-Step Verification** → **App passwords**
* Generate a new app password for "Mail"
* Copy the 16-character password
2. **SMTP Settings for Google:**
* **SMTP Server**: `smtp.gmail.com`
* **Port**: `587`
* **Security**: TLS/STARTTLS
* **Username**: Your full Google Workspace email
* **Password**: The app password you generated (not your regular password)
3. **Configure in Vapify**:
* Enter these settings in the SMTP configuration fields
* Click **Test Connection**
* Click **Save Settings**
For Google Workspace, always use an app-specific password rather than your main account password. This is more secure and prevents authentication issues.
**Security Considerations for SMTP:**
* Never use your primary email password in third-party applications
* Always use app-specific passwords when available
* Use TLS/SSL encryption (port 587 or 465)
* Regularly rotate your app passwords
* Monitor your email account for suspicious activity
### Sender Email Address
Your sender email address is what recipients see in the "From" field when they receive emails from your Vapify platform.
**Best practices:**
* Use a professional email address on your domain (`support@youragency.com`, `hello@youragency.com`, `notifications@youragency.com`)
* Avoid generic addresses like `info@` unless that's your primary support email
* Ensure the email address matches your verified domain in your email provider
* Consider using a dedicated support address that your team monitors
### Testing Your Email Connection
Before saving your email settings, always test the connection to ensure everything is configured correctly.
**To test:**
1. Enter all your email settings (sender address, provider, API key)
2. Click **Test Connection** button
3. Wait for the test to complete (usually 5-10 seconds)
**If the test succeeds:**
* You'll see a green success message
* Click **Save Settings** to apply your configuration
* Your email settings are now active
**If the test fails:**
* Review the error message for specific details
* Common issues:
* Incorrect API key (check for typos)
* API key doesn't have proper permissions
* Sender email address not verified with provider
* Network connectivity issues
* Double-check your settings and try again
Always test your connection before saving. This ensures your email settings are correct and prevents issues with sending platform emails.
### Saving Email Settings
Once your test connection succeeds:
1. Click **Save Settings**
2. You'll see a confirmation message
3. All future platform emails will be sent through your configured provider
**What emails will be sent:**
* User invitation emails
* Password reset requests
* System notifications
* Billing and payment notifications
* Usage alerts and summaries
* Any other platform-generated emails
***
## Best Practices & Tips
### Branding Consistency Checklist
Ensure your agency branding is consistent across all touchpoints:
* [ ] Agency name matches your registered business name
* [ ] Logo is high-resolution and looks professional
* [ ] Favicon is simple and recognizable at small sizes
* [ ] Custom subdomain (if applicable) uses your primary domain
* [ ] Email sender address matches your support/contact email
* [ ] Logo displays correctly on both light and dark backgrounds
* [ ] All branding elements are saved and active
### Security Best Practices
**API Keys:**
* Never share your API keys publicly or commit them to version control
* Use environment variables or secure storage for sensitive credentials
* Rotate API keys periodically (every 6-12 months)
* Immediately regenerate keys if you suspect they've been compromised
* Use app-specific passwords for email when available
**Access Control:**
* Limit who has access to Agency Settings
* Use strong passwords for all accounts
* Enable two-factor authentication where possible
* Regularly audit who has administrative access
### Regular Maintenance
**Monthly checks:**
* Verify your logo and branding still appear correctly
* Test email deliverability by sending test notifications
* Check that your custom subdomain is still working
* Review email provider usage to ensure you're within limits
**Quarterly reviews:**
* Update logo or branding if your business rebrands
* Review and update email sender address if needed
* Audit API keys and rotate if necessary
* Check for any new features or settings available
***
## Troubleshooting Common Issues
### Logo or Favicon Not Appearing
**Possible causes:**
* Changes not applied yet (requires logout/login)
* Browser cache showing old version
* File size too large or format unsupported
**Solutions:**
1. Log out and log back in to your account
2. Clear your browser cache and hard refresh (Ctrl+Shift+R or Cmd+Shift+R)
3. Try uploading a smaller file size (under 2MB for logo, under 100KB for favicon)
4. Ensure you're using supported formats (PNG, JPG for logo; ICO or PNG for favicon)
5. Wait a few minutes for changes to propagate
### DNS/Subdomain Issues
**Subdomain verification failing:**
* Wait longer for DNS propagation (can take up to 48 hours)
* Verify CNAME record is created correctly with your DNS provider
* Check for typos in subdomain name or CNAME target
* Ensure you're using a CNAME record, not an A record
* Use a DNS propagation checker tool (whatsmydns.net)
**Subdomain not loading:**
* Clear browser cache
* Try incognito/private browsing mode
* Wait for full DNS propagation
* Verify SSL certificate is active (may take extra time)
* Check with your DNS provider that the record is active
### Email Deliverability Problems
**Emails not being received:**
* Check recipient's spam/junk folder
* Verify sender email address is correct
* Ensure your domain is verified with your email provider
* Test connection in Vapify settings
* Check your email provider's sending limits and usage
**Email bouncing back:**
* Verify sender address exists and can receive mail
* Check that recipient addresses are valid
* Ensure your domain has proper SPF and DKIM records
* Review bounce reason in your email provider's logs
* Contact your email provider's support if issues persist
### API Key Errors
**"Invalid API key" errors:**
* Double-check you copied the entire key (no spaces or extra characters)
* Verify you're using the correct type of key (e.g., Private API key for Mailgun)
* Ensure the API key has the correct permissions in your email provider
* Try regenerating the API key in your email provider
* Check if the key has been revoked or expired
**Connection timeout:**
* Check your internet connection
* Verify your firewall isn't blocking the connection
* Try again in a few minutes (temporary service issue)
* Contact Vapify support if the issue persists
***
## Need Help?
If you're experiencing issues with your agency settings that aren't covered in this guide:
**Contact Vapify Support:**
* Email: [support@info.vapify.agency](mailto:support@info.vapify.agency)
* Include screenshots of any error messages
* Describe what you've already tried
* Mention your plan type (Free, Starter, Business, etc.)
**Related Documentation:**
* [Quick Start Guide](/quickstart) - Step-by-step setup instructions
* [Billing & Usage](/features/billing-and-usage) - Configure payments and pricing
* [Subaccounts](/features/subaccount) - Manage client accounts
* [Assistants](/features/assistants) - Set up voice assistants
***
We're here to help you create a professional, fully-branded voice AI platform for your agency!